


Best Brands and Tips to Buy Binoculars, Telescopes & Tripods for Birding.
Birding equipment
The birding equipment, a telescope or just scope, with tripod and binoculars, will not only identify you as birdwatcher, but are your most important tools for observing birds in the field! If you have the possibility, it’s worth to invest a little more for the good brands when buying your equipment for bird watching.
Impressively and interestingly enough, the technology of binoculars and scopes have remained – since the use of foolhardy pirates and suchlike – the same! They are set together by the 3 elementary components 1) lenses, 2) prism system and 3) eyepieces.
The object your looking at reflects rays of light and they strike the lenses. Inside the binoculars/telescopes this light is corrected by the prisms and through the eyepieces it hits the human eye. That works very much the same way today. As these technological traits still remain the same, quality and ergonomics have improved and evolved light years.
So, if you wonder what model of binocular/scopes suits most for birdwatching, and you even consider buying a new model, you’ll find some info here in this blog. You can confidently leave grandfather’s old pair of binoculars, weighing 2 kg, crosshairs in each lenses and independent focus knob for each barrel in the antiquity box! Read on!
A lot has been written in depth about different brands of optical equipment used for birdwatching. Rather to compare them technically here, I share personal opinion and experience about what to consider when choosing/opting for a certain brand or model.
Binoculars for Birdwatching
Let’s start with binoculars, your most important tool for birding obviously. For the use of bird watching, the following factors are most important:
- They should be ergonomic (not too large & heavy as you’ll carry your bins for many hours, fit in your hands, the focus knob should be reached operated easily, they should fit your eyes (with or without glasses).
- Optically they should be of fine quality, robust and suitable for tough weather conditions like rain and high air-humidity as well as different light condition!
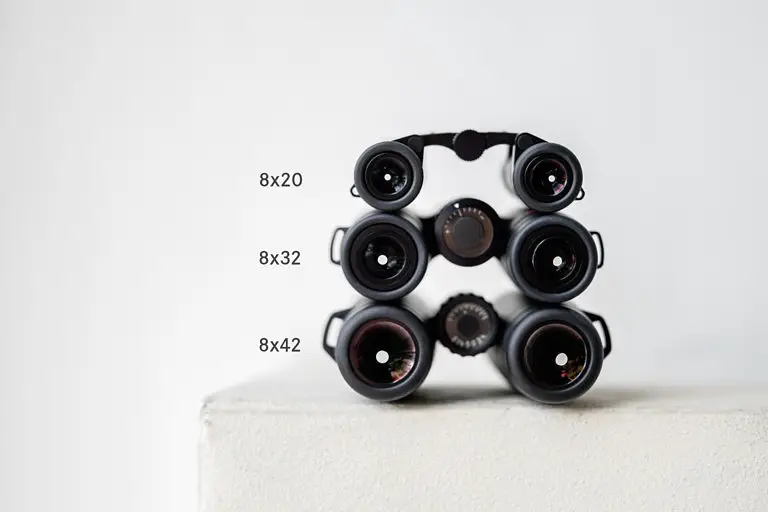
Magnification and diameter of the front lens.
Magnification
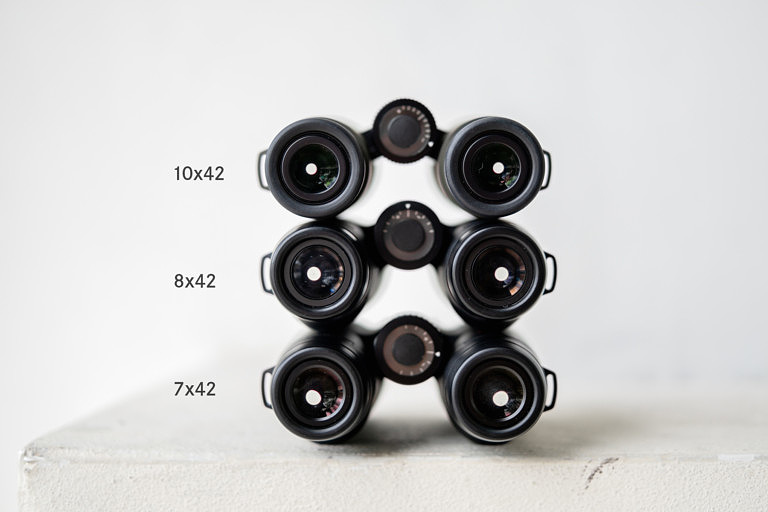
On all binoculars you’ll find two numbers (e.g. 8×42). Here is a brief primer on what those numbers mean. The first number (8) refers to magnification. You therefore see the object 8x bigger/closer than you do with normal eyesight.

For birding you should use a model between 7 – 10x magnification. Models with a 7x and 8x magnification hold the following advantages:
- A brighter picture,
- A wider field of view (makes it easier to find birds)
- Better depth of focus (a benefit especially it forest, where birds often hide beneath several layers of foliage),
- Shorter minimum focus distance (oh boy, did this Antbird come close… or if you use your binoculars for butterflies, insects and other critters).

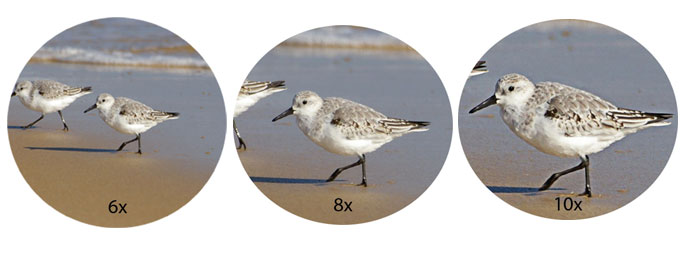
10x have the advantage that more details are recognized. Compared to 7x magnification the difference can be important in order to detect subtle plumage details. The difference between 8x and 10x is obviously less, and it is highly subjective on what one likes or prefers more.
Less magnification would not be enough for recognizing many of the relevant identification details on birds. With magnification larger than 10x, you won’t be able to hold binoculars quiet and get a shaky picture.
Diameter of the front lens
The second number refers to the diameter of the front lens in mm (in our example 42). The larger this number is, the more light enters and hits the prisms (but as well, the heavier your model will be!) and therefore you get a brighter picture.
You should be aware, that your eye-pupil can take up only a certain amount of light. During the day the eye-pupil remains open about the same size. It opens up (and can take up) more in twilight so a brighter picture (through binoculars) is only perceived in dark conditions.
Carrying heavy, luminosity intense binoculars around your neck during the day, is therefore totally useless! Models with strong luminosity work only and best in very dark forest interior, where sometimes just 5% of daylight penetrates the forest floor or twilight hours!
For birding purpose, the diameter of the front lens shouldn’t be bigger than 42. If you opt for one the top 3 best brands Swarovski, Zeiss, Leica (sequence changeable) you won’t do anything wrong, as they are (and have been) the undisputed industry leader! Optically they all are of finest quality and their top-models all fulfill the above-mentioned requirements.
Nikon, Vortex, Bushnell produce good-high quality binoculars, for (a little) less money. Ask specialists, birding buddies and browse the web for the many options.
Zoom binoculars or image stabilized binoculars are notwithstanding requirements for birdwatchers. They are to heavy with to small field of view, and have limited brightness.

Telescopes & Tripods
Scopes are a the other widely used optical aid for birders. They offer way larger magnification than binoculars, allowing you to observe distant birds without disturbing them. As well, they’re frequently used for taking pictures (digiscoping). The scope’s two elementary components are 1) lens and 2) eyepiece.
To support a device with such large magnification you need a tripod, as well.
Lenses.
Smaller and lighter telescopes usually have an objective diameter of around 60 mm. With these compact devices, a wide-angle eyepiece improves the brightness of the image.
Most producers also offer scopes with a larger lens diameter (up to 95 mm, but the same rule applies as for binoculars: The bigger the opening – the more glass there is – the heavier it gets). However, as the larger aperture can focus more light, these instruments also give a brighter picture. They are therefore better suited for use in unfavorable lighting conditions and for photographing.
To reduce color deviations, some manufacturers use specially coated glasses (APO, ED, HD). The picture is brighter and more brilliant on these devices than on conventional telescopes. As in binoculars, best brand are Swarovski, Zeiss, Leica which also are the most expensive and approved sellers. Kowa, Nikon, are top brands, too. Check out Celestron, Vortex, Optolyth & Pentax to name but a few more.
Eyepiece.
The magnification depends on the eyepiece used and ranges from 15 × to 75 ×. There are special eyepieces with even greater magnification, but these are not suitable for bird watchers. Magnification between 20 × and 60 × is the rule. When using larger magnification, the amount of light and thus the brightness of the image usually decreases significantly. In addition, every vibration of the scope and flickering of the air – when heated or windy – is felt much stronger.
For most scopes of renowned manufacturers, there are different interchangeable eyepieces on offer. Eyepieces with fixed focal lengths were formerly used most, because they were visually superior to the former zoom eyepieces thanks to their simple design. Today they are no longer available from all producers.
Zoom eyepieces now deliver equal results. Since a single eyepiece usually covers the entire range of 20 × to 60 ×, which is important for bird watching, they have become standard today, and some manufacturers produce high quality zoom wide-angle eyepieces.
You’ve noticed that there are two different scope/eyepiece-versions: 1) Straight and 2) angled forms. Both forms offer the same quality and both have their (dis)advantages. With straights you’ll find the birds easier and it is more protected from rain. As well it’s more comfortable to use them in hides and blinds. With angled forms it’s easier to follow a moving object, it’s more relieving for your neck and easier to watch birds in treetops. They are also better for tall people and they are more stable.
Tripod & tripod-head
Do not forget to consider the use of a good tripod & tripod-head, which has to provide good stability. Even the best scope produces no good pictures when it trembles with every little shock. The tripod should have a sufficient height, in addition to a frictionless running it should be equipped with a fluid and smooth tripod-head.
Gitzo and Manfrotto (European providers), offer the best brands. Some are made of carbon. Those are very light but still robust & stable. And very expensive! Most are made of aluminum. There is a big array of cheaper models on the market.
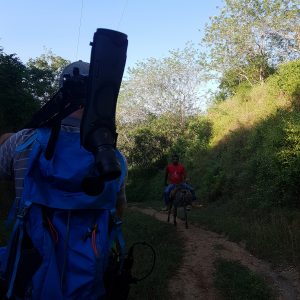
Before buying and taking a scope into the field, ask yourself, where and for what you are going to use it! If you plan your trip focusing on birding only or mostly in forest interior, a telescope is your least important tool. If you want access for observing the canopy, a decent tower or walkway is your gateway rather than a scope.
In fact, I always take my scope to any place (fool, me) in the Amazon rainforest, only to find out, that after a couple months birding, I didn’t even used it once… Scopes are best used in open areas, forest edges and lodge clearings, as well for migration watching (raptors etc.). If you use your telescope for digiscoping, the matter is obviously different, and topic of another blog entry.
Buying optical equipment for birdwatching
In my opinion, when buying optical equipment for bird watching it’s worth to invest a little more for a good brand, if you have that possibility. Yes, the best ones are the most expensive ones. But you’ll get what you’ll pay for. And, if taken care of (see below), they might be your faithful companion in the field for a lifetime!
Good brands invariably offer better picture quality, as well they are more robust and all are waterproof (nitrogen-filled, very important in neotropical environment). As well, their customer service is more reliable than the cheap junk brands! In any case, it’s mandatory to compare your favorite models side by side in order to choose & purchase your personal favorite.
Remember, if you wear glasses, check that you have the full field of view and that you have good comfort using while looking through your tools.
While going through the evaluation process, don’t let too many cooks spoil the meal: Get advice from birders and not hunters, sailors etc. They might know everything about optics and such, but their application areas – hence the binoculars and scopes – are totally different than those ones required and used by birders!
Finally, handle your optical equipment with utmost care! No, it’s not meant to be forgotten in whatever remote roadside café, taxi/bus seat, or on your vehicle-roof while driving off… Keep away equipment from heavy dust, DEET Bug spray and other extreme conditions. Store it well when not using it.
Cleaning your birding equipment

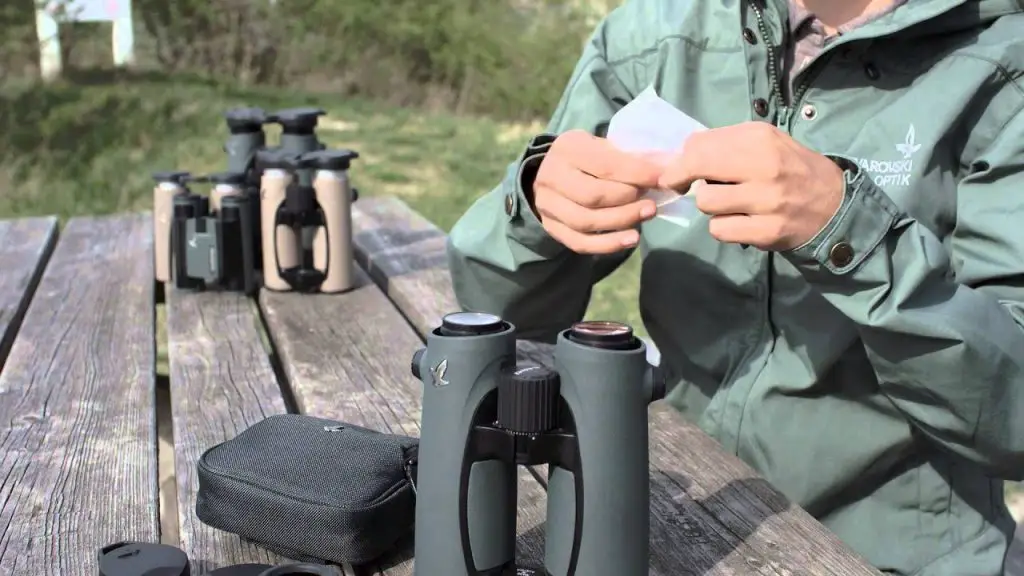
Don’t touch lenses with your fingers and never clean them with tissue, toilet paper, paper napkins, newspaper etc. All of those contain wood-fibers that will scratch and destroy the lens coating which can’t be repaired or replaced.
Clean your equipment with microfiber lens cloth. Blow off all dust and other material from lenses, before cleaning it with liquid and/or lens cloths. If you clean it with liquids use water (especially for sea-spray) or lens-cleaner that doesn’t attack lens coating.
Your optician will (should) know, which one is safe to use. Apply only small amounts of liquid and then wipe softly. When it comes to birdwatching, your optical equipment will make all the difference in perceiving and enjoying what you see! Choose well, and take care of it…
Recommended reviews and pages:

About the Author:
Jérôme Fischer.
Professional bird guide, swiss native, with more than 32 years of experience guiding hardcore birders and birdwatching tours. He has been focused in bird identification. He also travelled many countries, starting in Switzerland and then exploring south America, the most biodiverse continent in the world, becoming specialized in Neotropical birds.


